Rain Garden Design Tips for Your Home or Landscape
Save water and enhance your yard with something beautiful and cheap


Landscaping & Sustainability
Rain Garden Design Tips for Your Home or Landscape
What are rain gardens and how can they help save water? Simple, rain gardens are designed to collect stormwater runoff and filter pollutants before they enter local waterways. They’re cheap and easy to maintain and they’re also great for attracting birds, butterflies, bees, and other beneficial insects.
I live in the New Jersey Highlands, a very unique geological formation that blesses us with lots of natural springs, water, and unique floral and fauna. It’s my little slice of paradise and a nasty drought this year got me thinking about writing this article.
Why? Because water has been on my mind for decades. The purity of it, its management, and most especially the groundwater recharge aspect of it.
Water will be even more critical now that the Mississippi River is drying up. Rivers all over the world are drying up and if we can capture some of the rain from our property and get it back into the ground, we can help out the environment and have something beautiful to look at.
Here are design tips for your home or landscape when planning and building out a rain garden.
Choose the right site
Before you start digging, make sure you choose the right site. You’ll need to consider things like slope, soil type, drainage, and more.
If you live in an area with heavy rainfall, you might need to install a system that diverts excess water into a holding tank until it’s ready to use again. This might take the form of a dry well or even an underground cistern. These are expensive to install and should only be done if it’s required by your town’s ordinances or you have a special situation. This is never the default option!
Finding the right site is as simple as looking for the lowest area in your front or backyard. You’ll also need to take note of how sunny it gets and if you’re going to impact your neighbor. Directing rainwater to your neighbor’s basement is not a nice thing to do, so plan it out before you dig and move water there.
Understand your soil layer
Part of finding the right site is also being aware of what kind of underlying soil you have. Every house will have between six to nine inches of an organic layer that you call a lawn. This is the organic topsoil layer and where the plants tend to root themselves in to.
What’s underneath this organic layer is also very important. What you want to find is a fairly porous layer underneath your organic layer to let the water drain away. The time it takes to drain away will be dependent upon the soil layer. If it’s very sandy (like Florida) it will drain quickly. If it’s very clayey (like parts of New Jersey) it might never drain.

A handy tip is to use the Web Soil Survey from the USDA National Resource Conservation website. You just enter your address and it will give you a soil profile. You can click on the soil groups and find out how well it drains.
Understanding your rainfall
You can’t have a rain garden without rain! Do you know how much rain you get? There’s a simple way to find out how much rain you get, on average. You just need to look at the NOAA precipitation tables!
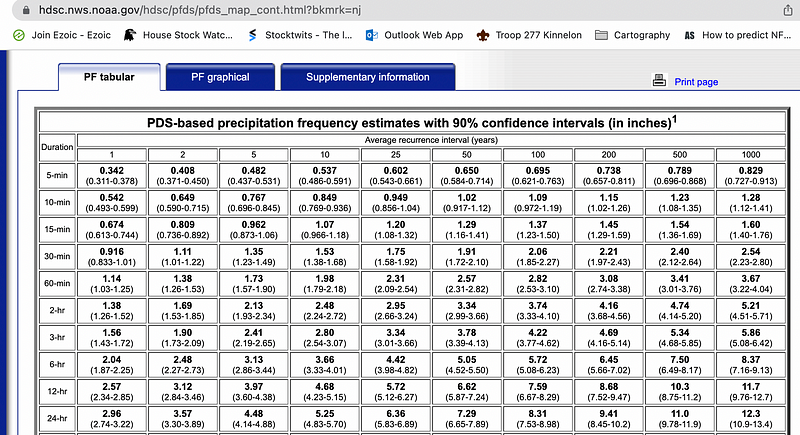
Note: The column header in the screenshot above is listed as “Average recurrence interval (years).” This is nothing more than the probability that this rainfall event could occur in a year.
Using this information to build your rain garden can be a bit tricky. You need to do a bit of calculation to determine the water volume you will add to your rain garden. Why? Because you want it to store enough water for a short period of time and let the plants soak up water before the rest of it percolates into the ground.
The other side of being able to store the water long enough is to make sure you don’t overflow and cause problems for your neighbor. How do you figure this all out? It starts with calculating your runoff first.
Calculating runoff and volume may seem a daunting task at first because of terms like “storm event” or “rainfall frequency.” These terms tell a designer what precipitation values to use to calculate the volume. You’ll read or hear terms like “a two-year storm” or a “100-year storm.”
For example, a 100-year recurrence/storm means that this level of rainfall (in inches) happens, on average 1% of the time in any given year (1 divided by 100). A two-year storm occurs more frequently, it’ll occur on average 50% of the time in any given year. A one-year storm will occur on average 100% of the time in a given year.
What it doesn’t mean is this, the storm happens once every two years and then you wait another two years for it to happen again. A lot of people think this is what happens with a 100-year storm. Nope, you could have two back-to-back 100-year storms because their recurrence is just probably, a chance.
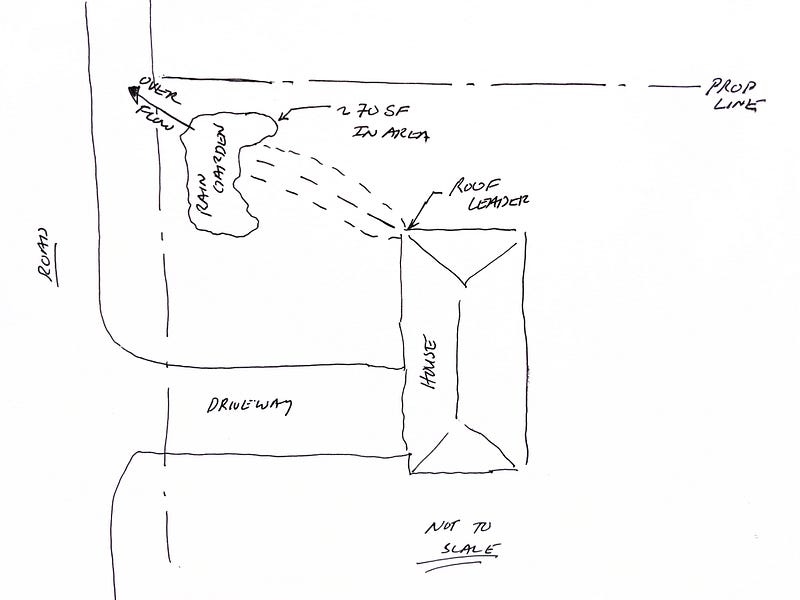
Let’s assume a two-year storm for 1 hour. That’s 1.38 inches. If my house is 30 feet wide by 40 feet wide, my roof area is 1,200 square feet (SF). Assuming half of the roof area will drain to your rain garden in the front year, that’ll be 600 SF of contributory area.
Now, let’s convert the rainfall inches to feet by dividing by 12. That will yield a rainfall of 0.115 feet of rain in one hour for a two-year storm.
Then multiply 600 SF by 0.115 feet and you get 69 cubic feet (CF) of water. 1 cubic foot of water is equal to 7.48 gallons, and if you multiply 69 CF by 7.48 gallons/CF, you get 516 gallons of water.
WOW! That’s a lot of water from a storm that has a 50% chance of occurring in a year. Just scale that up for every house in your neighborhood and imagine 516 gallons spilling out of every house’s gutter and into the road during a rain storm!!!
Build a drainage system for your rain garden
Rain gardens get their water from roof leaders and downspouts. Usually, these roof leaders drain at grade, meaning they spill out onto the ground. In some cases, they have a concrete splash pad that directs the water away from your house. In other cases, they connect to an underground drain system that directs the water away from the house too!
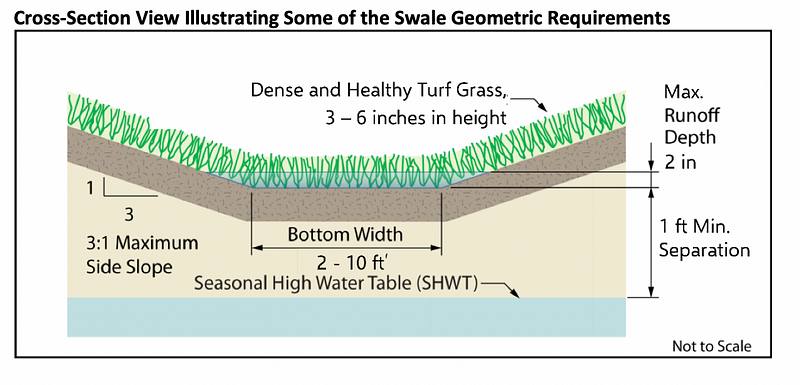
The next step is to direct the roof leader runoff to the rain garden. This can be accomplished in several ways. The easiest is to create a small swale/ditch.
Rain garden design
Once you’ve built a swale or used an underground pipe you will need to excavate out a rain garden area. You can use any shape you like but I prefer kidney-shaped ones. This way I can berm things up and adjust the layout to how I want it to look relative to my yard.
Rain gardens are often referred to as Bioretention systems and there are many design guidelines available online. The key things to think about are these:
- Can I store the volume of water?
- If I get too much rain, can I control where the overflow will go?
Remember, we’re directing 69 CF of water (561 gallons) to your little rain garden. If it’s not big enough to handle the water it will overflow and the last thing you want to do is let that water overflow into a neighbor’s yard or basement. You have to think about where any overflow will go. If your rain garden is in the front yard the overflow will likely go toward the road. The backyard will be trickier because you’re probably surrounded by neighbors on all three sides.
Once you’ve chosen the perfect spot, dig out an area at least 24 inches deep and wide enough to accommodate the volume of runoff.
If you assume you want to have a 1-foot deep rain garden, then you will need to lay out an area of 69 SF (69 CF/1 FT). That figures out to be a 7-foot by 10-foot rectangle. Dig down an extra foot (2 feet in total) and fill up to six inches of that hole with pea stone or gravel. Then fill up another six inches of topsoil. Those six inches of topsoil will become your planting area.
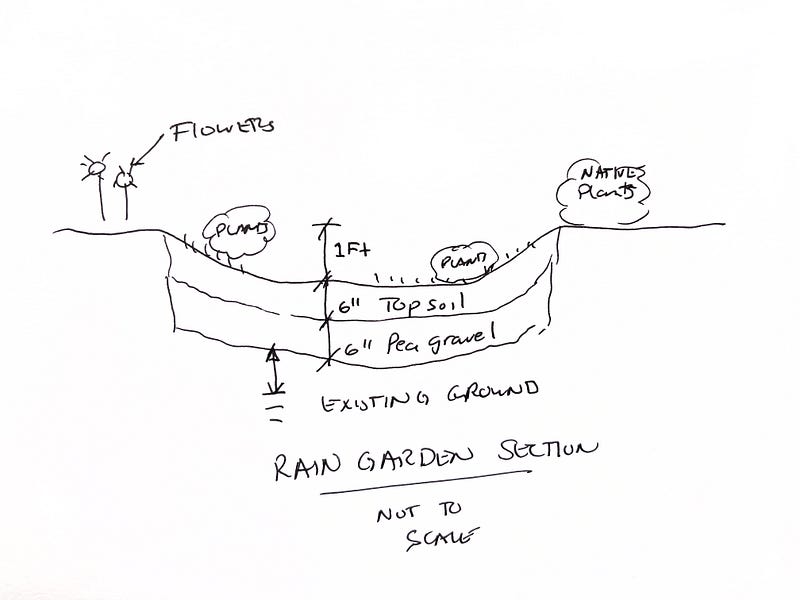
Add plants
You’ll need to choose plants carefully because they will determine how well your rain garden performs. Choose plants that thrive in wet areas, such as sedges, grasses, ferns, and other ground covers. Avoid invasive species, such as Japanese knotweed, Himalayan blackberry, and garlic mustard. Plant native plants that like to get wet and then dry out, and put them on the edge of your rain garden.
Go online to your State’s Department of Environmental Protection (DEP) site and search for a list of native plants that thrive in wet, transient, and dry areas.
Put the plants that love to be wet in the area low spot of the rain garden and the ones that like to be less wet on the edges. For the ones that like to get wet and dry out fast, put them around the edges.
Rain garden end notes
Building and maintaining a rain garden is very easy to do. It’s a wonderful way to add some beauty to your property and provide some habitat for pollinators, birds, and other animals.
Just remember to use sustainable landscaping practices when maintaining your rain garden. Try to avoid using pesticides and herbicides and use only native plant species.
For some elbow grease and a run to your local home improvement store, you can build your rain garden cheaply and fast.
Subscribe to Me


Read More From Me